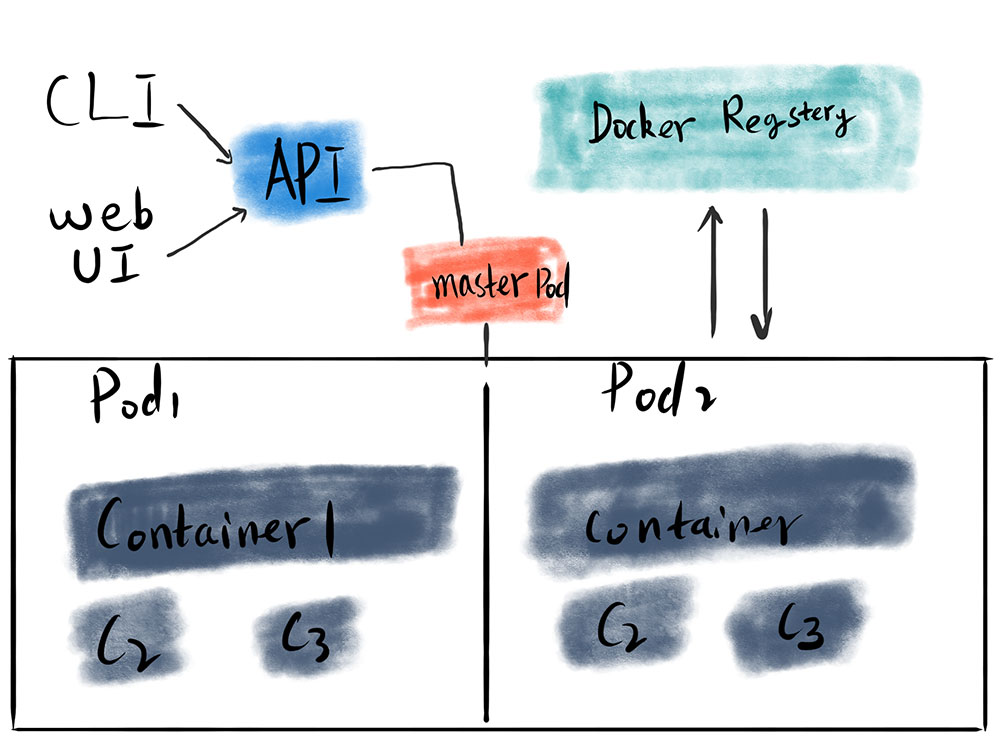
Kubernetes is different from Docker Swarm, it has Pods and running Containers inside Pods. Here is a simplified Kubernetes architecture diagram. In this tutorial, we are going to go through all the steps from setup Kubernetes on your local device to run Rails on a local Kubernetes cluster.
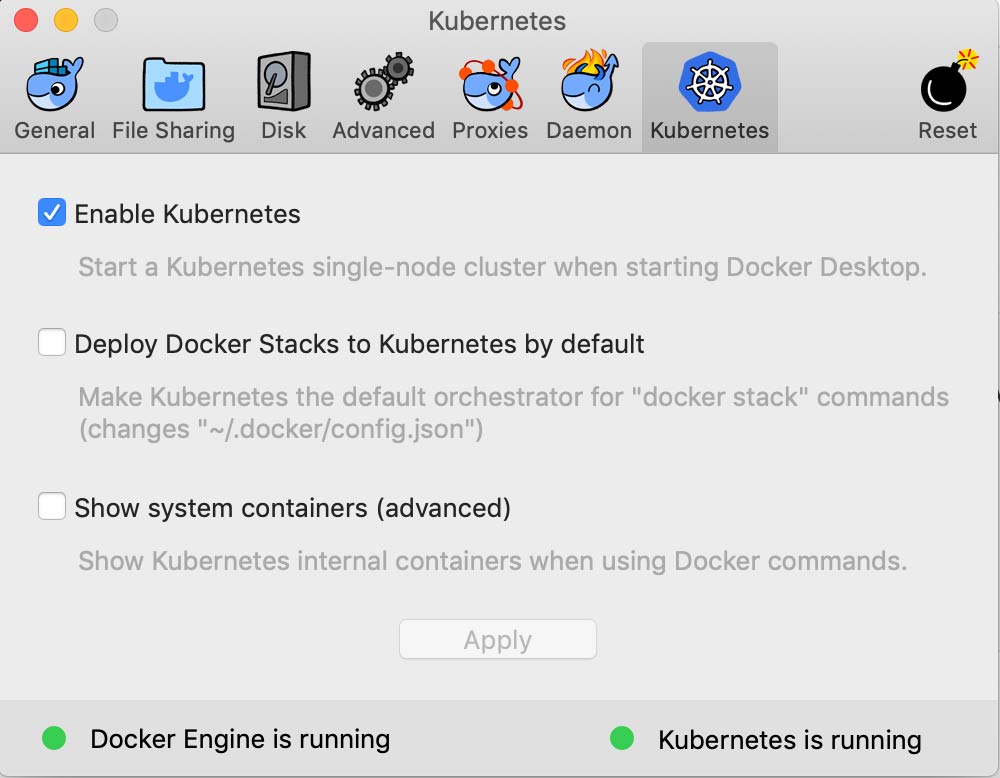
Activate Kubernetes Support on Docker for Mac
Using Docker App is a very common way for engineers to run and debug Kubernetes on local devices. You can enable Kubernetes by clicking on the checkbox.
Let's make sure we already connected to the Docker-Desktop, please set up the config first if it's not. Each context has its namespaces and users.
➜  ~ kubectl config get-contexts
CURRENT   NAME                 CLUSTER                      AUTHINFO             NAMESPACE
*         docker-for-desktop   docker-for-desktop-cluster   docker-for-desktop
          minikube             minikube                     minikube

➜  ~ kubectl config use-context docker-for-desktop
Switched to context "docker-for-desktop".
Create a Rails Project
Rails New
First of all, if you don't get any Rails project on your hand, create a new one. Since we don't need run Rails on the host machine, just skip installing Gem packages by adding --skip-bundle.
rails new rails-on-kube --skip-bundleCreate Docker Entypoint
Once you get a Rails project created, touch a docker entry point file docker-entrypoint.sh.
#!/bin/ash

bundle exec rails db:migrate && bundle exec puma -C config/puma.rb
Create Dockerfile
To build a docker image, we need to create a Dockerfile at the project root directory.
FROM ruby:2.6.0-alpine

RUN apk --update add build-base tzdata git \
    libxslt-dev libxml2-dev openssl \
    sqlite-dev yarn\
    && rm -rf /var/cache/apk/*
RUN gem install bundler

ENV RAILS_ROOT /var/www
WORKDIR $RAILS_ROOT

COPY Gemfile* ./

ENV RAILS_ENV=production

RUN bundle install --jobs 10 --retry 5 --without development test
RUN rails webpacker:install

COPY . .

RUN chmod u+x docker-entrypoint.sh
CMD ["sh", "docker-entrypoint.sh"]
Build Project Image
Now, we come to the last steps of creating a Rails project image. Paste and run the following command, a new Docker image will be available on your local.
docker build -f Dockerfile -t rails-on-kube .
Setup Kubernetes for Rails
Finally, we reach the last part of setting up Kubernetes. We should keep in mind, every object in a Kubernetes context can be considered as a resource, each resource can be defined by a YAML file.
To keep this tutorial clear and sample, we only need one resource YAML file, here we go.
Create Kubernetes Resource File
Filename rails-on-kube.yaml
In this file, we are going to deploy a Rails service based on the docker image we built before. imagePullPolicy: Never means using local images, or you may get an image Not-Found-Error.
replicas: 2 means there is going to have two replicas of the Rails service.
The two main functions of Deployment Yaml is to declare pods and setup replicas.
apiVersion: apps/v1
kind: Deployment
metadata:
  labels:
    app.kubernetes.io/name: rails-on-kube
  name:
spec:
  replicas: 2
  selector:
    matchLabels:
      app.kubernetes.io/name: rails-on-kube
  template:
    metadata:
      labels:
        app.kubernetes.io/name: rails-on-kube
    spec:
      containers:
      - image: blog:latest
        imagePullPolicy: Never
        name:
        ports:
        - containerPort: 3000
Pull up Rails App
The last step is using kubectl apply to update the Kubernetes cluster to match the descriptions from a YAML file. Then, exposes an external IP address, so we can access the service.
kubectl apply -f rails-on-kube.yaml
kubectl expose deployment rails-app --type=LoadBalancer --name=rails-service
curl localhost:3000 to check whether the server is up running.
Destroy Rails App
Here are commands to release the resource we have declared before.
kubectl delete deployment rails-app
kubectl delete services rails-service

# kubectl scale deployment my-app --replicas=1
Extra Commands
I also got some extra command lines of Kubernetes for you to debug.
Debugging and Logging
# Get the detail of pods
kubectl describe pods

# Get the info of a service
kubectl get services rails-service
Exec Command in Container
# Show all service pods you created
kubectl get pods

# Exec sh in a pod
kubectl exec -it my-app-64d75bd9d9-8nlfk -- sh

# Show logs of a pod
kubectl logs rails-app-5897fdc7b8-dhvj6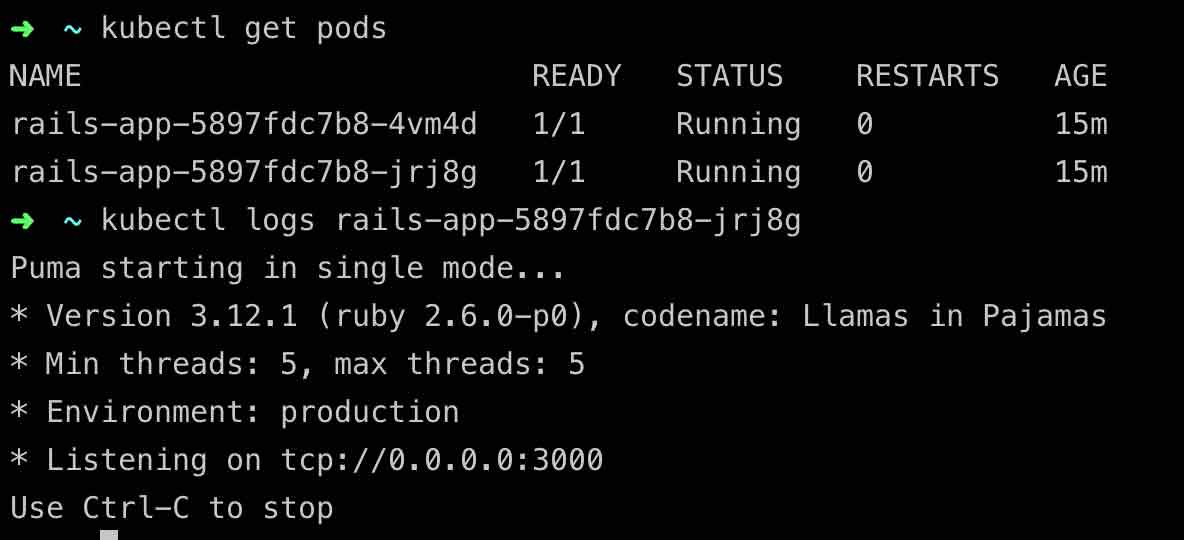
In addition, it's better to use Helm to manage your Kuberneters applications in the production environment. Check it out if you are interested, but for a demo purpose, using Kubernetes YAML file directly is more efficient.