
Goal
To figure out a sample, but an implementable way of handling RabbitMQ failure. We are going to set up a RabbitMQ cluster on your local device with HAProxy as a load balancer, and synchronizing queues between different RabbitMQ nodes will also be included.
Setup Environment
In this post, I'm going to use Ubuntu 18.04.3 LTS and going to build RabbitMQ and HAProxy from the source package with the latest version.
Ruby is the programming language for the following examples.
I'm not going to use the docker images which are ready on Docker hub. This time we can do it step by step to see how it works.
Install Build Environment
sudo apt update
sudo apt -y install autoconf libncurses-dev build-essential
sudo apt -y install m4 unixodbc-dev libssl-dev libwxgtk3.0-dev libglu-dev fop xsltproc g++ default-jdk libxml2-utils
Install Ruby Bunny
As described on the document, bunny is easy to use, feature-complete Ruby client for RabbitMQ.
sudo apt -y install ruby
sudo gem install bunny
Install Erlang
Erlang, the programming language that Ericsson had originally developed for their telephone switching gear. What grabbed Matthias’s attention was that Erlang excelled at distributed programming and robust failure recovery.
RabbitMQ in Action: Distributed Messaging for Everyone Book by Alvaro Videla and Jason J. W. Williams
RabbitMQ is written by Erlang, also has the advantages of Erlang.
wget http://erlang.org/download/otp_src_22.2.tar.gz
tar -zxf otp_src_22.2.tar.gz
cd otp_src_22.2
export ERL_TOP=`pwd`
./configure
make
sudo make install
Install RabbitMQ
Thanks to Erlang VM, we don't need to rebuild the package, we can use RabbitMQ after unpacking it.
cd ~
wget https://github.com/rabbitmq/rabbitmq-server/releases/download/v3.8.2/rabbitmq-server-generic-unix-3.8.2.tar.xz
tar -xf rabbitmq-server-generic-unix-3.8.2.tar.xz
cd rabbitmq_server-3.8.2
Install HAProxy
# Install HAProxy
wget http://www.haproxy.org/download/2.1/src/haproxy-2.1.2.tar.gz
tar xfz haproxy-2.1.2.tar.gz
cd haproxy-2.1.
make clean
make -j $(nproc) TARGET=linux-glibc
sudo make install
Setup RabbitMQ Cluster
Pull Up Servers
First, we should create pull up three RabbitMQ servers in the background, and each one has its port.
# Pull up servers
RABBITMQ_NODE_PORT=5672 RABBITMQ_NODENAME=rabbit ./sbin/rabbitmq-server --detached
RABBITMQ_NODE_PORT=5673 RABBITMQ_NODENAME=rabbit_1 ./sbin/rabbitmq-server -detached
RABBITMQ_NODE_PORT=5674 RABBITMQ_NODENAME=rabbit_2  ./sbin/rabbitmq-server -detached
Join Cluster
Then, Join the rabbit_1 and rabbit2 to rabbit@host01 to form a RabbitMQ cluster. To keep the servers pure, we have to stop them first and run reset.
# Join cluster
./sbin/rabbitmqctl -n rabbit_1@host01 stop_app
./sbin/rabbitmqctl -n rabbit_1@host01 reset
./sbin/rabbitmqctl -n rabbit_1@host01 join_cluster rabbit@host01

./sbin/rabbitmqctl -n rabbit_2@host01 stop_app
./sbin/rabbitmqctl -n rabbit_2@host01 reset
./sbin/rabbitmqctl -n rabbit_2@host01 join_cluster rabbit@host01
Run RabbitMQ Apps
After the management enabled on the first node, we can access the dashboard by open http://localhost:15672/#/, or by running a command line ./sbin/rabbitmqctl cluster_status.
# Start RabbitMQ Apps
./sbin/rabbitmqctl  -n rabbit_1@host01 start_app
./sbin/rabbitmqctl  -n rabbit_2@host01 start_app
./sbin/rabbitmq-plugins enable rabbitmq_management
./sbin/rabbitmqctl -n rabbit_2@host01  cluster_status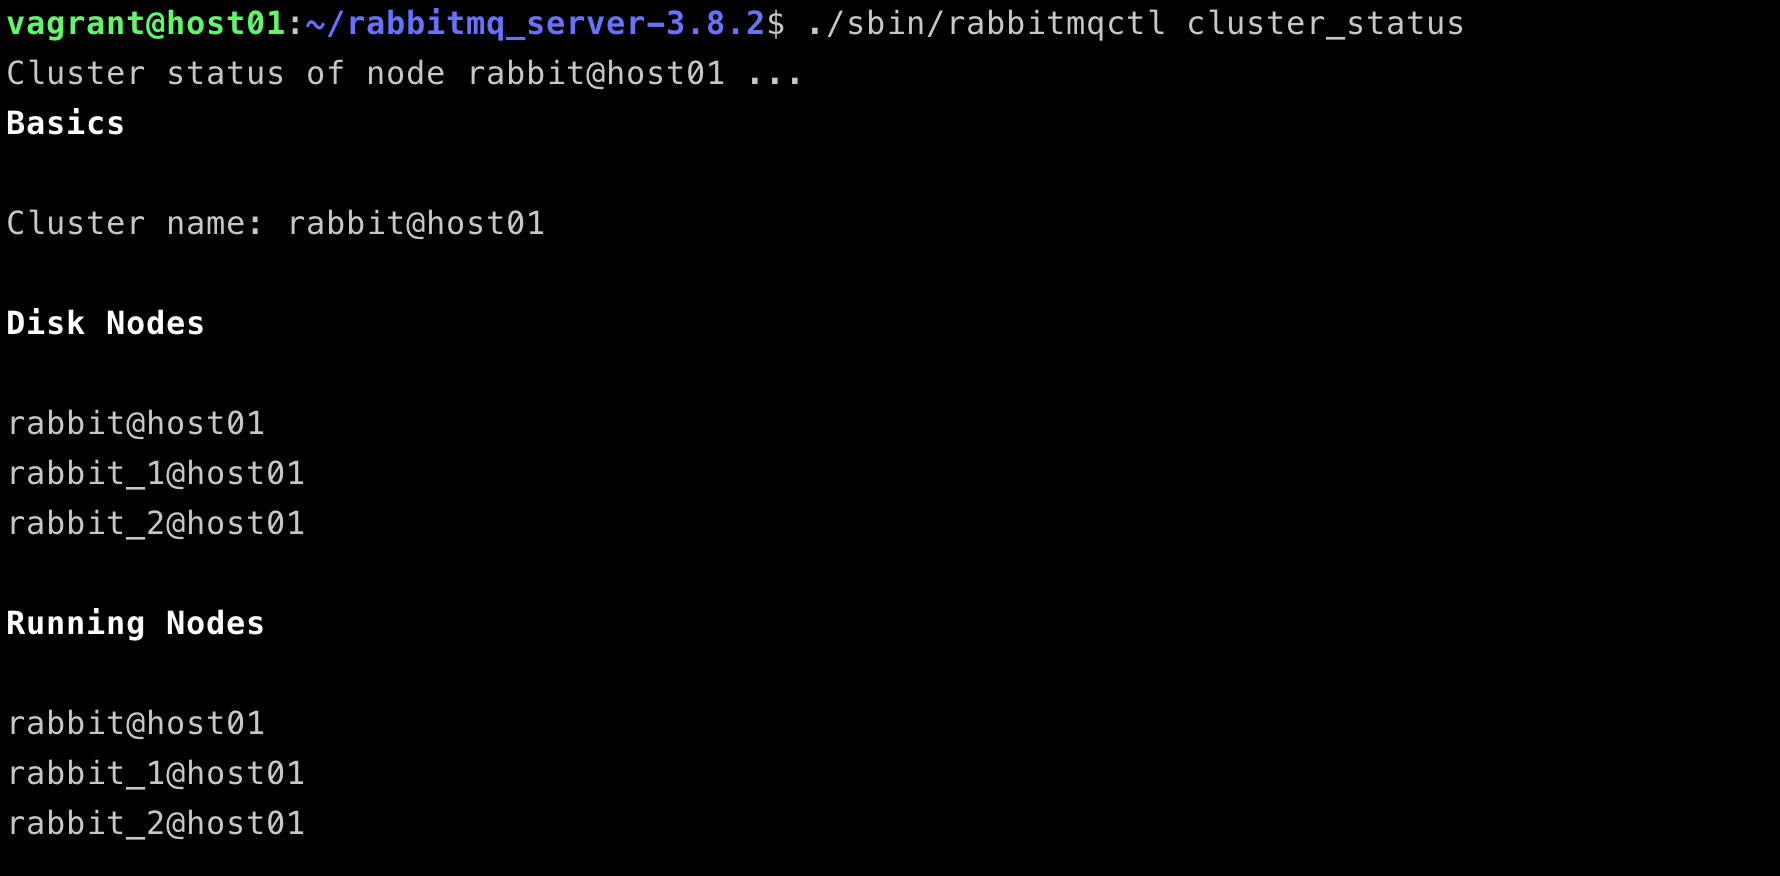
Remote Access
If you do not visit the dashboard from localhost, you should setup a new user for remote access.
# set a new user
./sbin/rabbitmqctl add_user test test
./sbin/rabbitmqctl set_user_tags test administrator
./sbin/rabbitmqctl set_permissions -p / test ".*" ".*" ".*"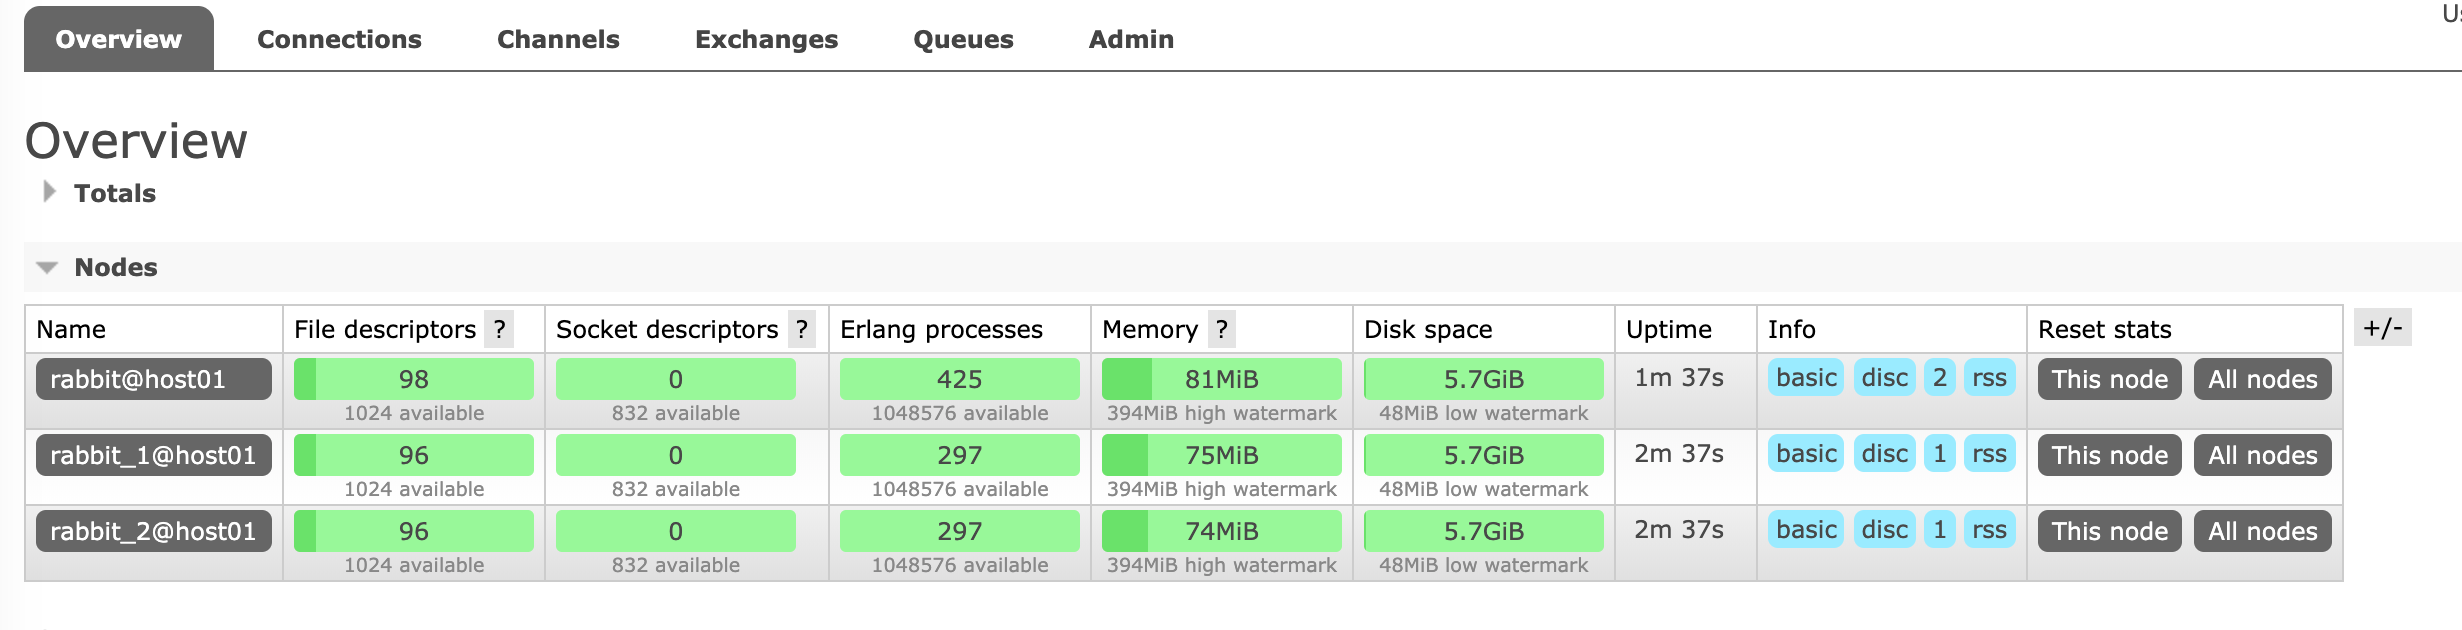
All RabbitMQ nodes are up and running well in a cluster.
RabbitMQ HAProxy Load Balance
HAProxy Configuration
Here is an example of my local HAProxy configuration for three RabbitMQ nodes.
global
    log 127.0.0.1   local0
    log 127.0.0.1   local1 notice
    maxconn 4096

defaults
    log global
    option tcplog
    option  dontlognull
    timeout connect 6s
    timeout client 60s
    timeout server 60s

listen  stats
    bind *:9000
    mode http
    option httplog
    stats enable
    stats hide-version
    stats realm Haproxy\ Statistics
    stats uri /

listen rabbitmq
    bind *:1999
    mode tcp
    option tcplog
    log stdout format raw daemon debug
    balance leastconn
    server rabbitmq localhost:5672 check
    server rabbitmq-01 localhost:5673 check
    server rabbitmq-02 localhost:5674 check
Now, you can run the haproxy with the configuration file you created.
# start HAPorxy
haproxy -f haproxy.cfg
Send and Receive Messages
Code Example
send.rb
#!/usr/bin/env ruby
require 'bunny'

connection = Bunny.new

connection.start
channel = connection.create_channel
queue = channel.queue('hello', durable: true)

channel.default_exchange.publish(ARGV[0], routing_key: queue.name)
puts " [x] Sent #{ARGV[0]}"

connection.close
receive.rb
#!/usr/bin/env ruby
require 'bunny'

connection = Bunny.new
connection.start

channel = connection.create_channel
queue = channel.queue('hello', :durable => true)

begin
  puts ' [*] Waiting for messages. To exit press CTRL+C'
  # block: true is only used to keep the main thread
  # alive. Please avoid using it in real world applications.
  queue.subscribe(block: true) do |_delivery_info, _properties, body|
    puts " [x] Received #{body}"
  end
rescue Interrupt => _
  connection.close

  exit(0)
end
Load Balance Example
Step 1, send messages
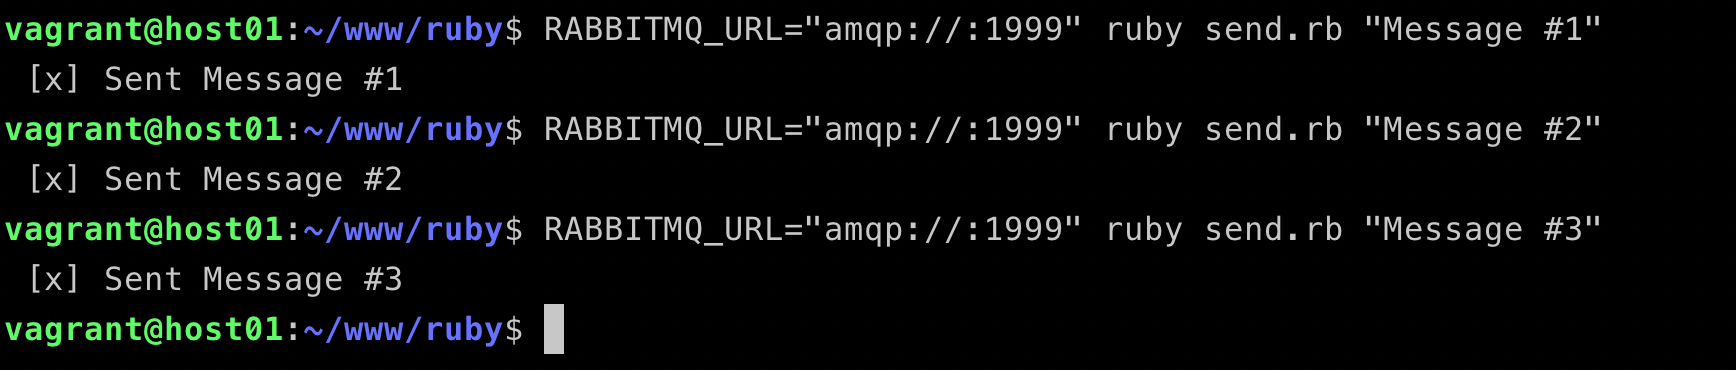
Step 2, view HAProxy logs

We can see that the load balancer is working very well, the connections are distributed to all three nodes, rabbitmq, rabbitmq-01 and rabbitmq-02.
Mirrored Queues
In the case above, the messages of that queue are stored on only one node whose name is rabbitmq. The queue will be unavailable if that node is down. But if we mirror the queues which we want to, the messages will be always available, even only one node left.
command
# List queues
./sbin/rabbitmqctl -n rabbit_2@host01 list_queues name policy pid slave_pids synchronised_slave_pids
output
vagrant@host01:~/rabbitmq_server-3.8.2$ ./sbin/rabbitmqctl -n rabbit_2@host01 list_queues name policy pid slave_pids synchronised_slave_pids

Timeout: 60.0 seconds ...
Listing queues for vhost / ...
name    policy  pid slave_pids  synchronised_slave_pids
hello       <[email protected]>
Enable Queue Mirror
The following command will set all the queues with names started with hello to be mirrored. I'm very pleased to see the pattern that supports regex.
From what i know, this feature of declaring queue with policy is not supported in the latest version of rabbitmq. The follow code will not be working.
queue = ch.queue('hello', durable: true, arguments: { 'x-ha-policy' => 'all' })command
./sbin/rabbitmqctl set_policy ha-all "^hello" '{"ha-mode":"all"}'output
vagrant@host01:~/rabbitmq_server-3.8.2$ ./sbin/rabbitmqctl set_policy ha-all "^hello" '{"ha-mode":"all"}'
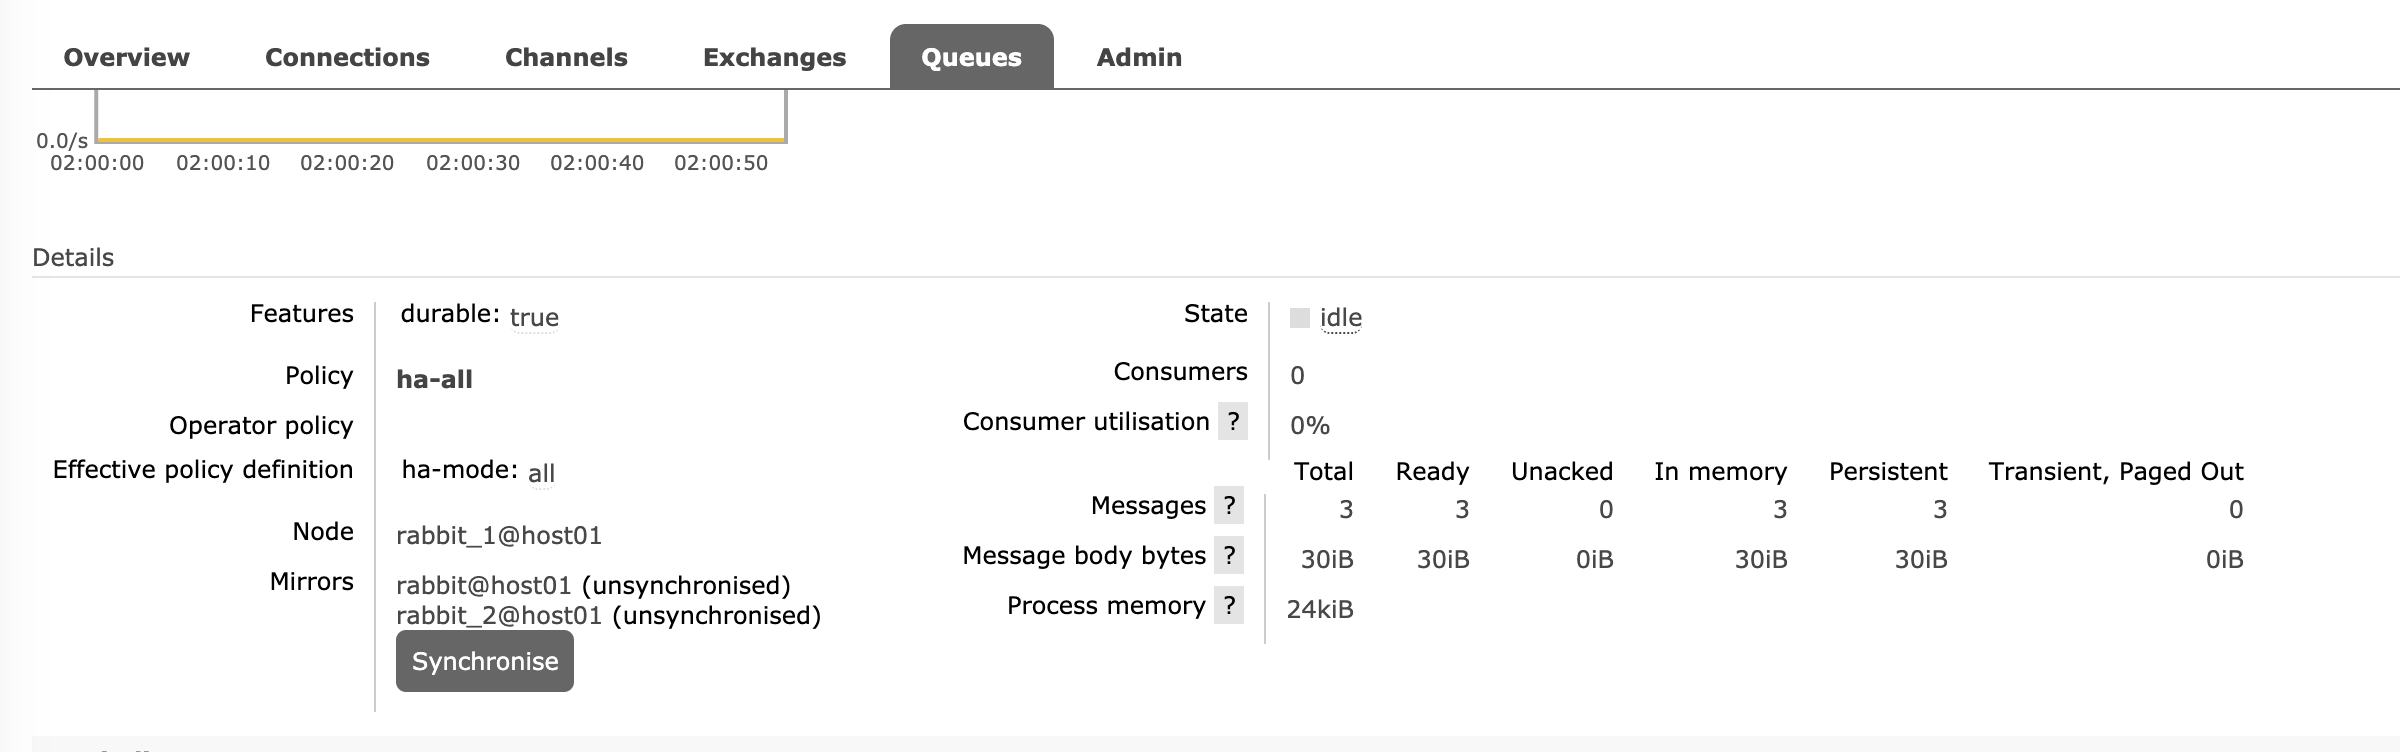
Setting policy "ha-all" for pattern "^hello" to "{"ha-mode":"all"}" with priority "0" for vhost "/" ...now we can see the queue is mirrored with the other two nodes, but the messages are not synced between nodes, you can run commandline ./sbin/rabbitmqctl sync_queue hello or just click the button Synchronise on RabbitMQ dashboard.

Under this condition, the consumer client won't encounter any errors with nodes failure. The messages will be published and consumed smoothly.
Recovery from Error on Code Level
If you are using docker, you can set up your own policy for failure restart, also you can do it only code level as you like.
Here is the pseudo-code of how to handle it on language level by using rescue or catch.
def consume
  begin
    do_something_with_bunny
  rescue => e
    logger.error e
    do_something_with_bunny
  end
end
Coming to conclusion, we have addressed four strategies on how to handle RabbitMQ failure.
- Using RabbitMQ Cluster to enable capacity.
- Using load balance to improve availability.
- Using mirrored queue to higher the durability.
- Using code error handler to improve the elasticity.
References
- Cover image from https://pixabay.com/vectors/rabbit-character-alice-in-wonderland-30751/