Why you should choose docker
You may not care about the continuous deployment or environment isolation, but you do really care about the simplicity and the convenience of development as a developer. You may also hear about the performance issue of Docker from some review articles. If you are not going to implement Docker on your production servers, you don’t have to worry about the noise.
Requirements
Docker are available on both Mac and Win, you could pick up what you like. After downloading and installing Docker on your OS, we can get started. The installation document is here https://docs.docker.com/docker-for-mac/install/. You don’t have to know the conceptions about container, tag, dockerfile, etc., but if you really want to dive into Docker a little deeper, you can start from here https://docs.docker.com/docker-for-mac/.
Step by step to run Docker on your local
- Create config files
First of all, let’s create some files and directories under your project directory. Like what I list below, the ./db-data/mysql and the ./source-code are both directories, and the others are files.
.
├── db-data
│   └── mysql
├── docker-compose.yml
├── php-apache.docker
├── source-code
│   └── public
│   └── phpinfo.php
└── test.vagrant.conf
Here below goes the content of the files. For reference, see https://docs.docker.com/compose/overview/.
docker-compose.yml
version: "3"
services:
  php-apache:
      build:
          context: ./
          dockerfile: php-apache.docker
      volumes:
          - ./source-code:/var/www/test
      ports:
        - "80:80"
      networks:
        - backend
  redis:
    image: redis:alpine
    ports:
      - "6379:6379"
    networks:
      - backend
  mysql:
    image: mysql:5.7
    environment:
      - "MYSQL_DATABASE=homestead"
      - "MYSQL_USER=homestead"
      - "MYSQL_PASSWORD=secret"
      - "MYSQL_ROOT_PASSWORD=secret"
    ports:
        - "3306:3306"
    volumes:
          - ./db-data/mysql:/var/lib/mysql:rw
    networks:
        - backend
networks:
  backend:
    driver: "bridge"version: "3" servi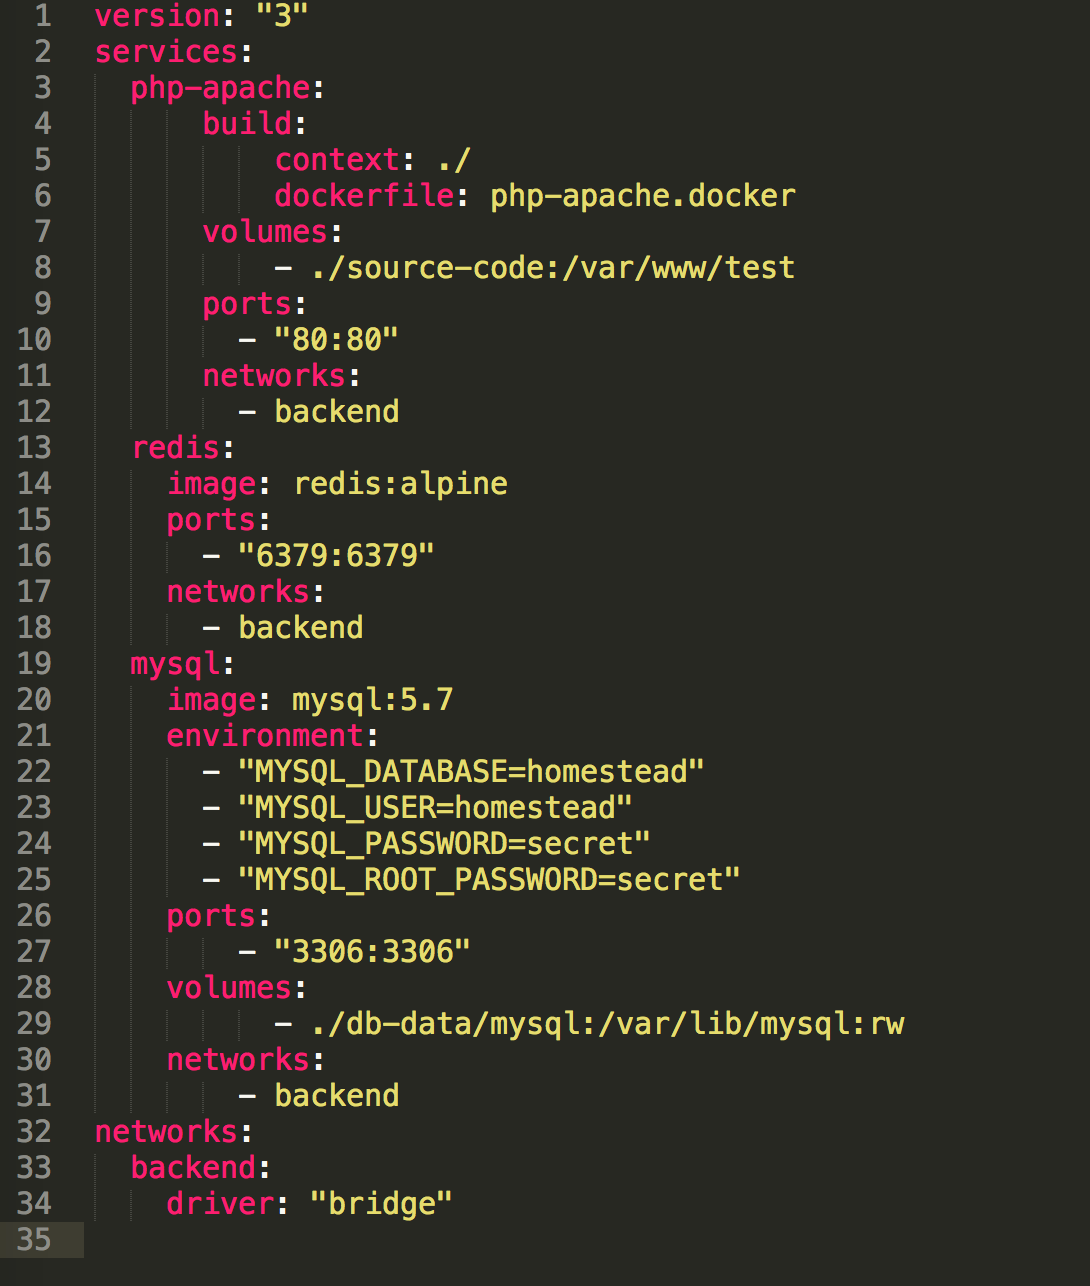
php-apache.docker
FROM php:7.0-apache
RUN apt-get update \
    && php -r "readfile('http://getcomposer.org/installer');" | php -- --install-dir=/usr/bin/ --filename=composer \
    && apt-get install -y git libxml2-dev libmcrypt-dev mysql-client \
    && docker-php-ext-install bcmath soap mcrypt pdo_mysql
RUN pecl install xdebug
RUN docker-php-ext-enable xdebug
RUN a2enmod rewrite
RUN apt-get install -y libz-dev libmemcached-dev
RUN pecl install memcached
RUN echo extension=memcached.so >> /usr/local/etc/php/conf.d/memcached.ini
ADD test.vagrant.conf /etc/apache2/sites-enabled/test.vagrant.conf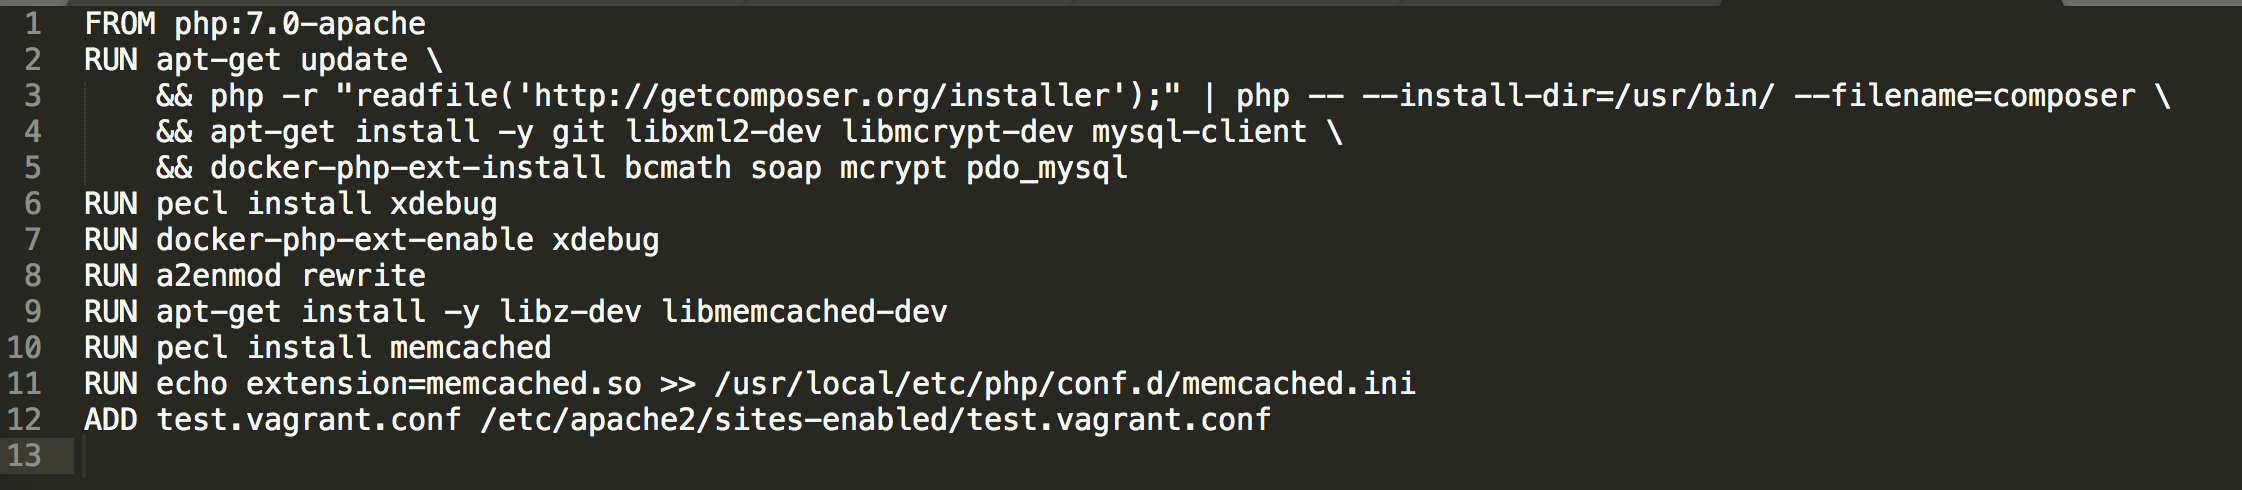
test.vagrant.conf
# The ServerName directive sets the request scheme, hostname and port that
# the server uses to identify itself. This is used when creating
# redirection URLs. In the context of virtual hosts, the ServerName
# specifies what hostname must appear in the request's Host: header to
# match this virtual host. For the default virtual host (this file) this
# value is not decisive as it is used as a last resort host regardless.
# However, you must set it for any further virtual host explicitly.
#ServerName www.example.com

ServerAdmin webmaster@localhost
DocumentRoot /var/www/test/public
ServerName test.vagrant

# Available loglevels: trace8, ..., trace1, debug, info, notice, warn,
# error, crit, alert, emerg.
# It is also possible to configure the loglevel for particular
# modules, e.g.
#LogLevel info ssl:warn

ErrorLog ${APACHE_LOG_DIR}/test-vagrant-error.log
CustomLog ${APACHE_LOG_DIR}/test-vagrant-access.log combined

# For most configuration files from conf-available/, which are
# enabled or disabled at a global level, it is possible to
# include a line for only one particular virtual host. For example the
# following line enables the CGI configuration for this host only
# after it has been globally disabled with "a2disconf".
#Include conf-available/serve-cgi-bin.conf

# vim: syntax=apache ts=4 sw=4 sts=4 sr noet
phpinfo.php
<!--?php
phpinfo();
2. Add the following line into system Host file
127.0.0.1 test.vagrant
3. Run the following command in your console at your project directory
docker-compose up --build
4. Then, visit http://test.vagrant/phpinfo.php, you will get a PHP info page. So far, a LAMP docker was set up.
Congrats, you have installed a configured LAMP stack using Docker!