Why Self-Host GitLab CE?
There's something compelling about running your own Git server instead of relying on a cloud provider. GitLab CE (Community Edition) is completely free and open-source, which means you're not locked into anyone's ecosystem or pricing model. When you self-host, you get total control over your data - your repositories stay exactly where you want them, your CI/CD pipelines run on infrastructure you own, and you're not subject to any vendor's terms of service changes. Plus, from a cost perspective, if you already have a server running somewhere, the marginal cost of adding GitLab is basically zero. You get the full Git hosting experience with merge requests, code review, project management, and a powerful CI/CD system - essentially everything you'd get from GitHub or GitLab.com, but under your own roof.
Prerequisites
Before you dive in, make sure you have a few things in place. You'll obviously need Docker installed and running - I'm assuming you're comfortable with Docker at this point since you're self-hosting. GitLab isn't exactly lightweight, so you'll want at least 4 CPU cores and 12GB of RAM available for the container to breathe comfortably. For accessing it, you'll need either a local domain name (I use gitlab.test for local development, which you can add to your /etc/hosts) or an IP address. And while it's not strictly required, I'd strongly recommend setting up persistent storage directories for config, logs, and data - losing everything when a container restarts is a painful lesson I don't recommend learning firsthand.
Setup the GitLab Instance
Here's the nice part - you don't need Docker Compose or any complex orchestration for this. A single Docker container is absolutely sufficient for a development or small team setup, which keeps things refreshingly simple.
Start by browsing to Docker Hub and checking out the available GitLab CE versions. Pick whichever version you prefer - I've found newer versions are generally more stable, but if you need a specific feature from an older release, you can obviously go with that.
Once you've decided on a version, run this command:
docker run --detach \
  --env GITLAB_OMNIBUS_CONFIG="external_url 'http://gitlab.test'" \
  --name gitlab-local \
  --cpus="4" \
  --memory=12g \
  --volume $PWD/gitlab/config:/etc/gitlab \
  --volume $PWD/gitlab/logs:/var/log/gitlab \
  --volume $PWD/gitlab/data:/var/opt/gitlab \
  --shm-size 256m \
  gitlab/gitlab-ce:18.3.0-ce.0
Let me break down what each flag does here because it matters:
--detach: Runs the container in the background so you get your terminal back--env GITLAB_OMNIBUS_CONFIG: This sets the external URL that GitLab will use - this is important because GitLab needs to know how to construct links and authentication URLs--cpus="4": Gives the container access to 4 CPU cores - GitLab really benefits from having enough CPU, and 4 is a reasonable minimum--memory=12g: Allocates 12GB of RAM - GitLab's Puma server and other processes are memory-hungry, so this is pretty essential--volume: These three volume mounts ensure your data survives container restarts:config: Where all your GitLab settings livelogs: Application logs for debuggingdata: The actual repositories, databases, and everything else important
--shm-size 256m: Shared memory allocation - this helps with performance and prevents some weird errors you might encounter otherwise
If you're just kicking the tires and don't care about losing data, you can completely skip the --volume flags. But honestly, it's worth the 30 seconds to create those directories and get persistence working.
After running the command, grab a coffee because GitLab takes a few minutes to initialize - probably 2-3 minutes depending on your hardware. You can watch the startup process with:
docker logs -f gitlab-localOnce you see messages indicating it's ready (look for something about Unicorn or Puma starting up), you can visit http://gitlab.test in your browser. GitLab will ask you to set a new password for the root user - the initial temporary password is stored in a file inside the container at /etc/gitlab/initial_root_password. You can grab it with:
docker exec gitlab-local cat /etc/gitlab/initial_root_passwordThat first login feels good - you're now running your own Git server.
Setting Up the Runner
Now here's where things get interesting. A GitLab Runner is basically a service that actually executes your CI/CD jobs - it's the thing that runs your tests, builds your Docker images, deploys your code, or whatever else you've defined in your pipeline. Without a runner, your GitLab instance is just a fancy repository browser; nothing actually happens when you push code.
There are two approaches here. The first is the quick and dirty method:
docker run -d --rm --name gitlab-docker-runner \
  -v /var/run/docker.sock:/var/run/docker.sock \
  gitlab/gitlab-runner:latest
This works fine, and the runner will happily execute jobs. The problem is that when the container stops or restarts, all the runner configuration goes away with it, and you'll need to re-register it next time. If you're just experimenting, that's fine. But if you're actually using this in any kind of real way, you'll want persistence.
Here's the version I recommend - it takes literally one extra line to mount a config directory:
docker run -d --rm --name gitlab-docker-runner \
  -v /YOUR_PATH_TO_SAVE/docker-runner/config:/etc/gitlab-runner \
  -v /var/run/docker.sock:/var/run/docker.sock \
  gitlab/gitlab-runner:latest
Just so we're clear on what's happening here:
-d: Runs in the background (detached mode)--rm: Automatically cleans up the container when it stops - this keeps things tidy-v /var/run/docker.sock: This mounts the Docker socket into the container, which lets the runner spawn Docker containers to actually run your jobs-v /YOUR_PATH_TO_SAVE/docker-runner/config:/etc/gitlab-runner: This persists the runner configuration so you don't lose it on restarts
Replace /YOUR_PATH_TO_SAVE with wherever you want to keep the config - maybe something like $HOME/gitlab-runner/config or /opt/gitlab-runner/config.
I'd really suggest going with the persistent version from the start. Those extra 30 seconds of setup will save you from re-registering the runner every time your machine reboots.
Register the Runner with GitLab
Now that both GitLab and the runner are running, you need to tell them about each other - this is the registration process. It's actually pretty straightforward, and the GitLab UI guides you through it pretty nicely.
Here's the step-by-step process, which honestly just takes a few minutes:
-
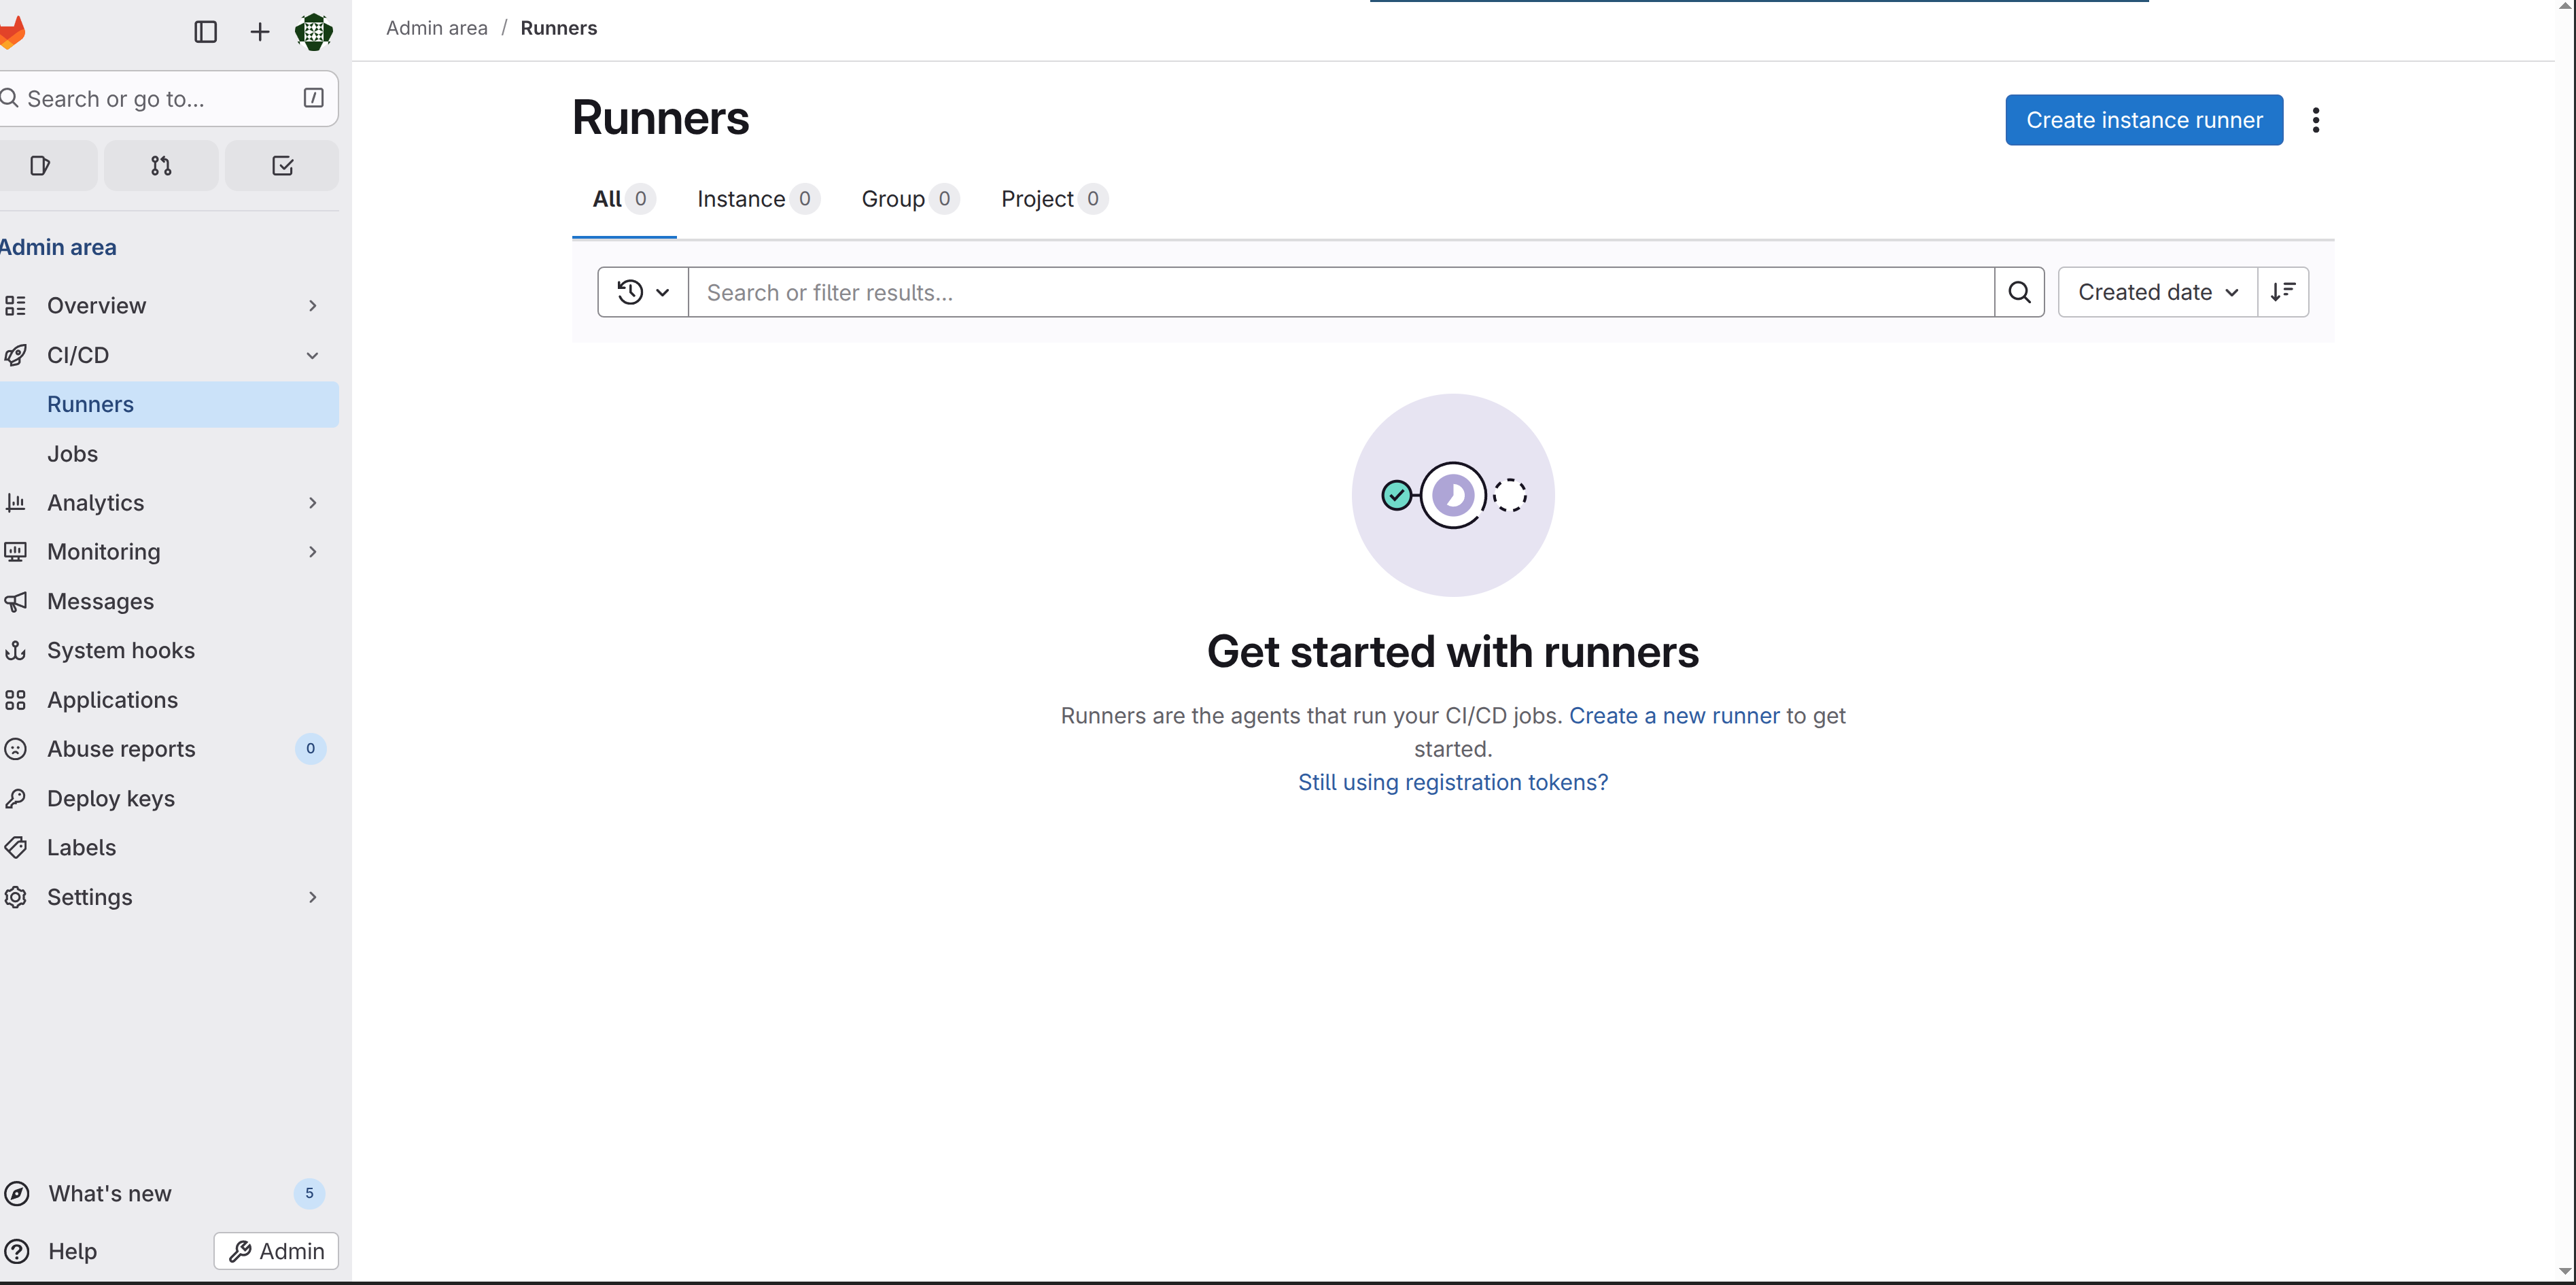
Navigate to
http://gitlab.test/admin/runners- this is the runners administration page where you can see all your runners and create new ones -
Click the "Create instance runner" button - don't let the terminology throw you; this just means you're creating a runner that belongs to the GitLab instance and isn't tied to a specific project
-
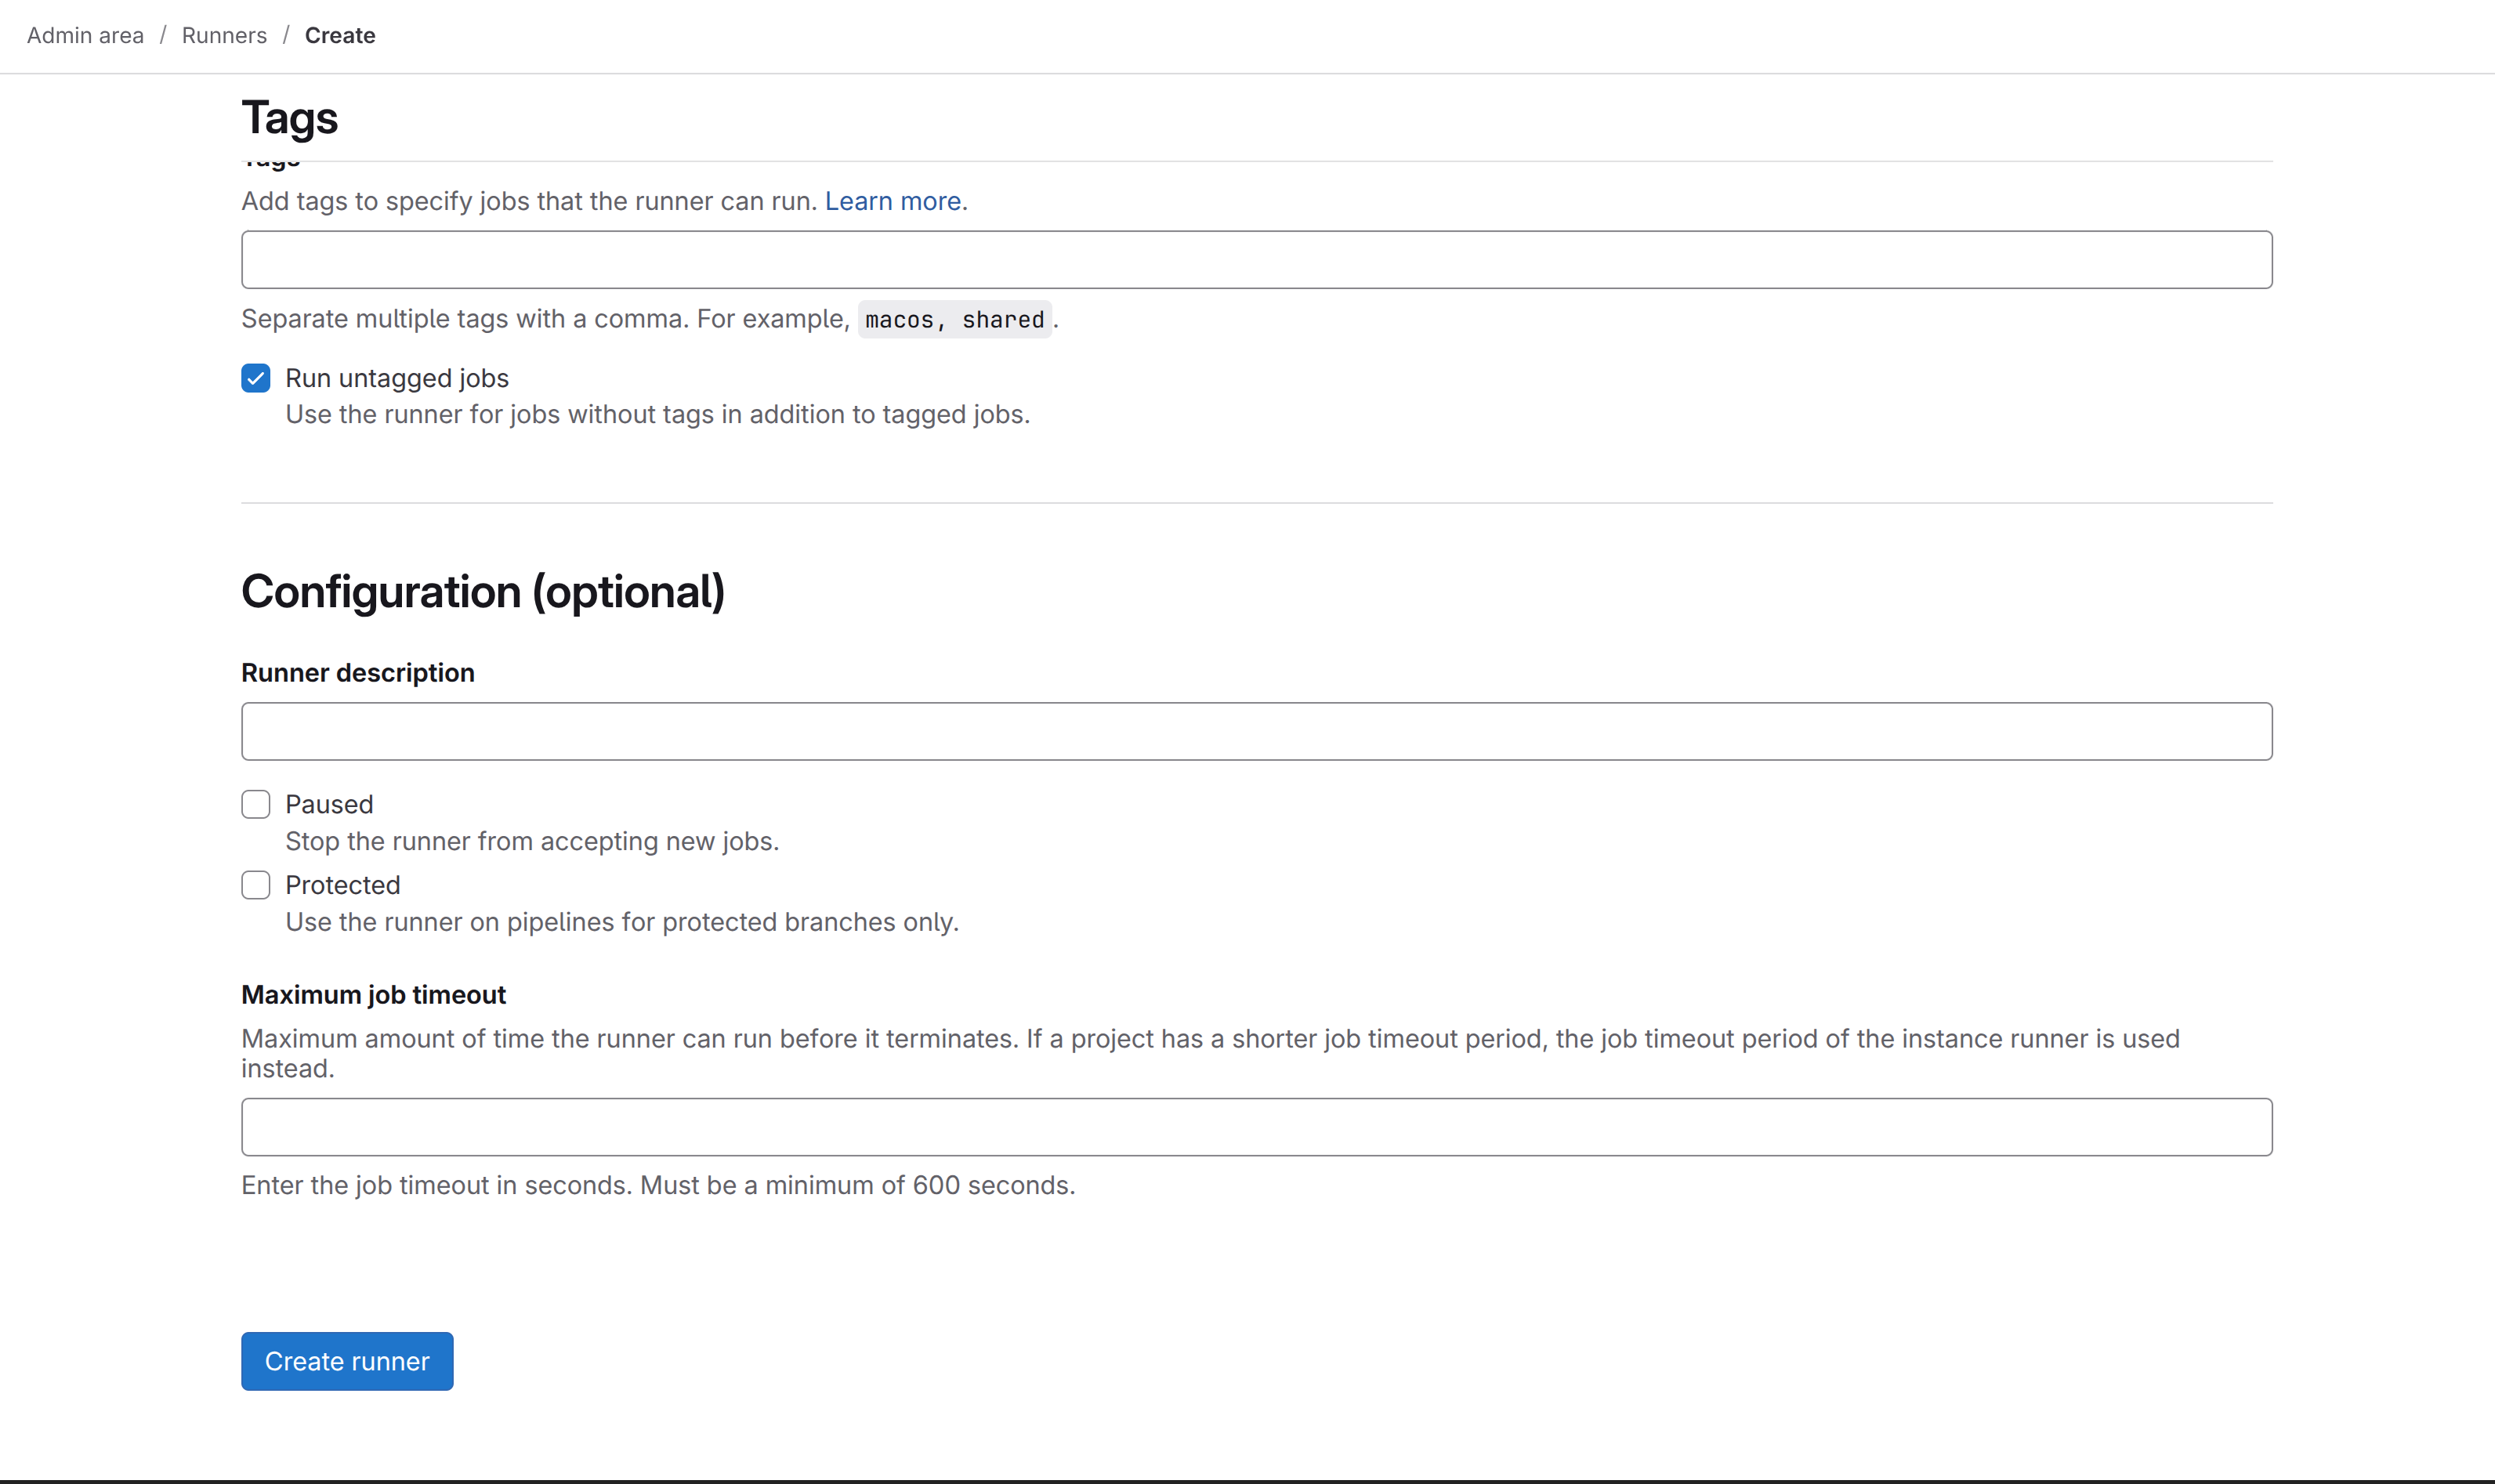
Check the "Run untagged jobs" checkbox - this lets the runner execute jobs that don't have specific tags, which is what you want for general use
-
Click "Create runner" and GitLab will generate a registration token for you - this token is basically a password that lets your runner prove it belongs to your GitLab instance
-
Copy that token somewhere you can access it in your terminal
-
Now in your terminal, register the runner by executing this inside the runner container:
docker exec -it gitlab-docker-runner gitlab-runner register \
  --url http://gitlab.test \
  --token <PASTE_TOKEN_HERE> \
  --executor docker \
  --docker-image alpine:latest
Obviously replace <PASTE_TOKEN_HERE> with the actual token you just copied. The --executor docker part tells the runner to use Docker for executing jobs, and alpine:latest is a lightweight base image for running commands. This is a sensible default but you can change it later if you need.
- Once the registration completes, refresh the runners page and you should see your runner listed there with a green checkmark showing it's active and healthy
At this point, your runner is alive and ready to execute jobs. Any CI/CD pipeline you define in a .gitlab-ci.yml file will now actually run when you push code.
Troubleshooting: Runner Running But Not Picking Up Jobs
This is probably the most frustrating scenario - you can see the runner is there, it's showing as active in the admin panel with a green checkmark, but when you push code and create a pipeline, the jobs just sit in a "pending" state forever. The runner completely ignores them. This usually happens because of one specific thing: the runner and the pipeline jobs have a tag mismatch.
Here's how the tag system works. When you define a job in your .gitlab-ci.yml file, you can optionally specify tags like this:
test:
  tags:
    - docker
  script:
    - npm test
This tells GitLab: "I want this job to run on a runner that has the docker tag." Now, when you register your runner, you can assign it tags. If you didn't assign any tags during registration (which is the common case), your runner gets no tags by default - it's literally a runner with an empty tag list.
The problem is that if your job explicitly specifies tags but your runner has no tags, there's no match, and the job will never run. It's like putting up a job posting that says "must speak French" and then hiring someone who only speaks English - they're never going to apply.
The fix is usually one of these:
Option 1: Make your runner accept untagged jobs (the easiest way)
Go back to http://gitlab.test/admin/runners, click on your runner, and make sure the "Run untagged jobs" toggle is enabled. This is exactly what you did in step 3 of the registration process. If you enabled it but jobs still aren't running, try toggling it off and back on again - sometimes it needs a refresh.
Option 2: Remove tags from your pipeline jobs
In your .gitlab-ci.yml, just don't specify any tags at all. By default, untagged jobs will match any runner that has "Run untagged jobs" enabled. This is probably what you want for a small setup anyway.
test:
  script:
    - npm test
Option 3: Add tags to your runner and match them in your jobs
If you really want to use tags (which can be useful for more complex setups with multiple runners), you need to match them exactly. Go to your runner settings, add a tag like my-runner, then in your .gitlab-ci.yml specify tags: [my-runner]. But honestly, for a first setup, this is overcomplicating things.
Pro tip: Check the pipeline job status page to see why it's not running. Click on a pending job and you should see a message like "This job could not be run because no runners are available" or "Runner can't pick job because it doesn't match tags." These messages are actually super helpful and will tell you exactly what the problem is.
The vast majority of the time, the issue is just that "Run untagged jobs" isn't enabled or the runner needs a moment to reconnect. But understanding the tag system will save you hours of confusion, so it's worth knowing how it actually works.
Next Steps
Congratulations - you've just built your own Git hosting platform. This is actually a pretty solid foundation. With GitLab and a runner both up and running, you now have the infrastructure to do some genuinely useful things.
You can start creating projects and pushing repositories to it like you would with GitHub or GitLab.com. The UI is almost identical, so if you're familiar with GitLab, you'll feel right at home. More importantly though, you can now define CI/CD pipelines by adding a .gitlab-ci.yml file to your repositories - that's where the real power comes in. You can run automated tests on every push, build Docker images, deploy applications, run linting checks, or basically anything else you can script.
The merge request workflow is also fully functional - you can have team members (or just yourself) open merge requests, request code reviews, and use all the collaboration features. The beauty of self-hosting is that all of this runs on your own hardware with no SaaS bills or vendor lock-in.
If you run into issues during the setup, the logs are your friend - docker logs gitlab-local and docker logs gitlab-docker-runner will show you what's happening. And honestly, once this is running, it's pretty stable. I've had instances running like this for months without any real maintenance required beyond the occasional restart.
Your self-hosted GitLab instance is now ready for development and CI/CD automation.